Pages

Monday, January 28, 2013

Caprese Cheese Buns

These little bundles of cheesy goodness are evil. Why are they evil? Because between 4 of us we pretty much polished off a whole tray of them.
They. Were. That. Good.
 
And really easy and fast to make. You can pretty much stuff them with anything you like...I like all things cheese, basil and tomato so decided on that route!


First decide on your filling and toppings. Prep them and set aside.
 
 
In your mixing bowl add 1 package of Instant Dry yeast (about 2 Tbsp) to 1 Cup of warm water. Let the yeast hand out in there for a couple minutes.
 
Next add 2 Tbsp White Granulated Sugar, 1/4 cup of Melted Butter, 1/4 Cup Canola OR Olive Oil and 2 Tsp Garlic Powder. Mix this together.
Using the dough hood attachment slowly add 3 Cups of All Purpose flour while mixing on medium speed. Add 2 Tsp of Salt and allow the mixer to knead the dough for about 7-10 Minutes. Grease the bowl and cover with a damp tea towl. Allow to rise in a nice warm area for about 30 Minutes or so.


Once the dough is ready break off a piece about the size of the palm of your hand.
 
Use your fingers to make a little well in the ball and add your cheese and basil
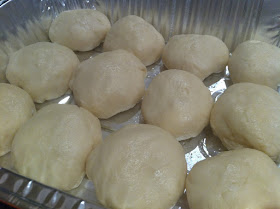
Fold over the dough and pinch until you have a nice little ball.

Arrange the dough balls seam side down in a greased pan.
Top the buns with thin tomato slices and more grated cheese (I used a mixture of Cheddar, Mozzarella and Parmesan). Bake in a 375F oven for about 20-25 Minutes or until the bread is golden brown.
While the buns are cooking prepare a bowl with some melted butter, dried Italian herbs and more garlic powder.
When the buns are fresh and hot out of the oven, brush them with the butter and herb mixture.
Break the buns apart and chow down!


Tuesday, January 22, 2013

Kale, Quinoa & Goat Cheese Crustless Quiche

I have been a super busy cook lately with tonnes of recipes being uploaded over the last week. I even prepped a bunch of blog posts so you won't have to wait weeks (ahem) in between my posts (Sorry readers!)

This recipe is a great addition to our quick and easy weeknight dinner rotation. I also happen to love quiche and love adding new and interesting ingredients to it.

The quinoa definitely gives this a different texture and makes this dish amazing served hot or cold!

First cook your quinoa according to package directions. I cooked 2 cups of quinoa in water and it was the perfect amount for this dish. No leftovers. Set the cooked quinoa aside.
Chop about 2-3 Cups of washed Kale. Set this aside as well.
In a large saucepan, caramelize 1 thinly slice onion with some olive oil, salt and pepper.
Once Onion is nicely caramelized add 2 Cloves minced garlic and your kale. Season and lower the heat. The Kale only needs a couple minutes to soften up.
Add your cooked quinoa to the kale and onions.
And add 1 cup shredded Cheddar and 1 small package (about 1/4 cup) of fresh goat cheese. Mix really well.
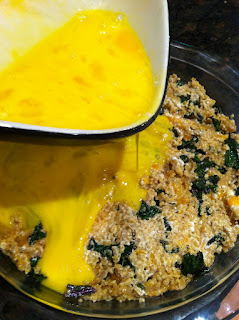
Pour about 6 large eggs over your mixture and combine. Pour into a oven proof pie dish and bake at 350F until quiche has puffed up and eggs are slightly browned on top (about 30 Minutes)
Slice and serve!


Tuesday, January 8, 2013

Roasted Parmesan Edamame

This recipe has become a favourite snack of mine. It was healthy until I added all the cheese, but I still tell myself I am eating healthy as opposed to a bag of chips or cookie.

First you need a bag of frozen shelled Edamame. I had to look in a few different grocery stores before I found it...and once I did I bought about 5 bags of it. So good!
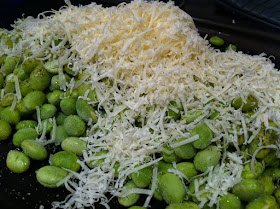
Toss the frozen edamame with about 1 cup of finely grated Parmesan, a drizzle of Olive Oil and lots of fresh ground pepper. I found this didn't need salt to my taste as the Parm is quite salty itself.
Spread the Edamame on a baking sheet and roast at 375F until starting to lightly brown on top (about 20 Minutes)

There you have it, crispy, salty, HEALTHYish snack!

Thursday, January 3, 2013

Salted Cod Sandwhich with Parsley Choritzo Salad


Happy New Year Readers!!!

I hope you all had a wonderful Holiday Season! I know I did! My Husbands family and I spent our holidays in Beautiful Banff and Calgary Alberta. Really a beautiful place to visit in the winter!

To get this year started I have a truly delicious recipe. It does take a little time to prepare but really worth it in the long run. The inspiration for this once again came from a favourite Food Network show of mine "Diners, Drive-ins, and Dives". They made a sandwich similar to this one on the show and I just HAD to replicate the flavours.


First take your salted cod (Boneless) and re-hydrate it in cold water for at least 24 hours. Changing the water every 12 hours or so.


After the cod is hydrated place it in a large pot with a handful of fresh thyme, 6-10 Whole Garlic Cloves and cover in 2% Milk. Bring to a light simmer and allow to gently cook until the cod starts to flake apart.


While the Cod is simmering make a batch of mashed potato's. I used about 6 Potato's since I had a large amount of cod. Add Butter, Milk, Salt and Pepper to your mash so it has a nice creamy consistency.


Once your fish is flaky and cooked flake it into a kitchenaid mixer with some of your mashed potato. You want a ratio of about 1 Cup flaked fish to 1 Cup potato. Add in some more fresh thyme and some fresh minced garlic as well. Just add to your taste. Season with Pepper. This probably will not need any salt.


Add a few splashes of heavy cream and turn the mixer on low....just to combine the mixture. Set this aside while you make your Parsley Choritzo Salad.


In a bowl combine 1 Choritzo Sausage, chopped and fried until crispy, 1/4 Red Onion thinly sliced, 1/4 Cup Oil Cured Black Olives, chopped, 2 Cups Chopped Flat Leaf Italian parsley. Lightly toss this mixture with Olive Oil and Red Wine Vinegar. Season with a little Black Pepper.


Toast up a nice fresh Ciabatta Bun with some butter and spread your Cod/Potato mixture on


Top the Sandwich with the Parsley Choritzo Salad and chow down. The flavours are very European and really remind me of my Portuguese heritage. The fish mixture keeps really well in the fridge so considering this dish takes a little time to make, I usually make a lot and eat it all week!

~Happy 2013~