Just a little ole working gal, who loves food

Monday, September 30, 2013

Green Unripened Tomato Salsa!

I have a TONNE of unripened tomato's still in my garden...and with the temperature slowly dropping I am praying that they start to ripen so I can make tomato sauce or something out of all of them. Then last week..the weatherman predicted 2 nights of frost. I had to save my tomato's. There were so many of them and I couldn't let them all go to waste. So I picked about 50% of them and decided to try my hand at making salsa with them. I used a mix of Heirloom, Roma and hot house tomato's...some completely green and some starting to turn red. But mostly Green tomato's. In the end the salsa was delicious and a great way to use up your end of season tomato's!!!
 
Ingredients
 
About 20-30 Unripened Tomato's, Various kinds and sizes.
2 Large Red Onions, Chopped
2 Red Chili Peppers, Minced
3 Green Peppers, Chopped
5 Garlic Cloves, Minced
1/2 Cup Lemon Juice
1/4 Cup White Vinegar
2 Tbsp Kosher Salt
1 Tbsp Black Pepper
1 Tsp Cayenne Pepper
1 Tsp Chili Powder
1/2 Cup chopped cilantro


Wash your tomato's well and pick out the most firm tomato's

Slice off the tops and squeeze all the seeds out.

Chop all the tomato's and place in a large heavy bottomed pot.

Add your onions, peppers and garlic.

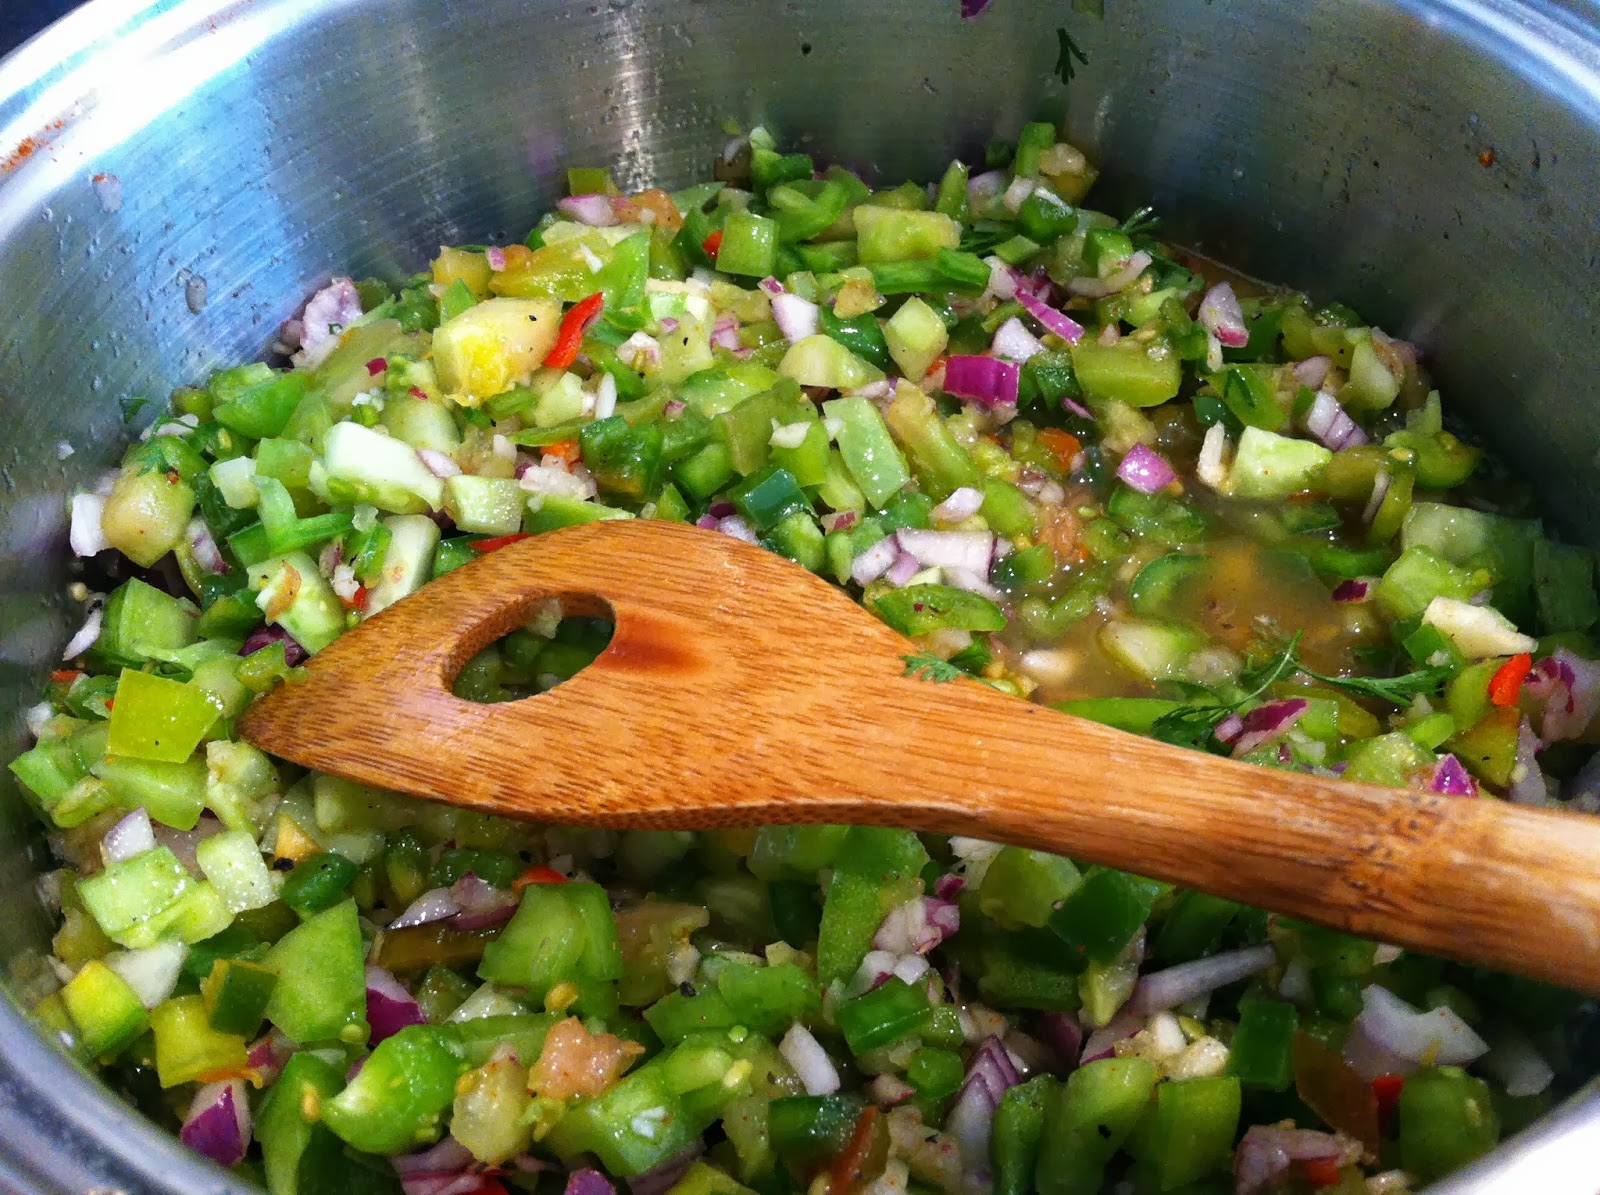
Add your vinegar, lemon juice and spices (S&P as well) and cilantro and bring to a boil over medium high heat. Once boiling reduce heat to low and allow to simmer for 1 hour covered.

after simmering is complete, carefully ladle hot salsa into sterilized mason jars. Seal and boil the sealed jars for about 15 minutes. Remove from the boiling water and allow the tops to "pop" while cooling. Your salsa can now be stored at room temperature until ready to serve (Once opened, must be refrigerated!)
This was my first real canning experience and it turned out great!! I want to invest in some real canning equipment (Pot and tongs) for next time though!!! Getting the hot jars out of boiling water was tricky!!

Tuesday, September 24, 2013

The Great Nacho Debate!

I follow another forum and a debate about nacho's (of all things) began. Olives or no olives. Guac or no Guac, Just cheese or the works. The thread went on for about 15 Pages. It was awesome. It also inspired all the posters to make their own nachos for dinner over the week. And at first I was like "Meh"...but then I couldn't get them out of my head! I HAD to have Nachos for dinner! So on Friday night...when my husband was out at a Stag for the evening, I bought a bottle of Red French Wine (to make it classy!) and made myself a way too big platter of nachos for dinner!!

BBQ Chicken Nachos

Ingredients:

1 Bag of Tortilla Chips
4 BBQ Chicken Thigh's, Cooled & Chopped (Seasoned with Chilli Powder before BBQing)
3 Scallions, Chopped
1 Small Orange Pepper, Chopped
3 Cups Old Cheddar Cheese, Grated
1/4 Cup Sour Cream
1/2 Cup Refried Black beans
1/4 Cup pickeled Jalapenos

Pico de Gallo (Recipe Below)
Homemade Guacamole (Recipe Below)

 
Line your baking tray in tin foil (no mess!!) and place 1 layer of tortilla chips down

Chop your scallions, pepper & BBQ chicken


Now start your first layer. Sprinkle half the chicken, peppers and Scallions over the chips. Place some jalapenos and some dollops of refried beans as well. Cover it all in a layer of cheese and place in a 400F oven until the cheese is melted.

Layer 1 Complete. The key to good nachos is double layering! So we do the same thing all over again!

Another layer of chips

And another layer of Chicken, Peppers, Scallions, Refried Beans, Jalapenos and Cheese. Now place some dollops of sour cream on the whole thing and back in the oven until the cheese is all melted and the chips start to brown on the outside.

In the meantime I prepared some pico de gallo and fresh Guac!
 
Pico De Gallo:
3 Roma Tomato's, Chopped
1 Jalapeno, minced
1/4 Red Onion, Minced
1/4 Green Pepper, Minced
1 Garlic Clove, Minced
Fresh Cilantro, Chopped
Juice of 2 Limes
Salt & Pepper
 
Guacamole:
4 Small Ripe Avocados, smashed with your fork and 1 pit in the bowl as well (to keep it green!)
2 Tbsp of the Pico de Gallo Mixture
More Garlic & Lime Juice to taste
Salt & Pepper
 

So now your nachos are all crispy and bubbling and ready to eat with your dips!

Enjoy with Wine if your classy or Beer if your a good time!

Monday, September 16, 2013

Apple Vinegar Slaw

With the weather getting cooler and the days getting shorter...its sad to think that summer is coming to an end and winter is just around the corner :(
I refuse to give up summer and am still cooking up some of my favourite summer meals! Today's recipe is for a refreshing summer coleslaw that we usually eat with either Ribs or BBQ Chicken.
 
Ingredients:
 
3 Cups shredded Cabbage (I use the pre-shredded bagged stuff)
1/2 Cup shredded Carrot
1/2 Cup shredded Granny Smith Apple
1/4 Cup finely chopped green Pepper
 
Dressing:
4 Tbsp Olive Oil
2 Tbsp Grain Mustard
1 Tbsp Honey
1 Tbsp Apple Cider Vinegar
Salt & Pepper to taste
 

Mix together all your vegetables

Looking colourful!

Whisk together the dressing ingredients

Dress the salad and toss

Garnish with fresh chopped cilantro! This Salad keeps well overnight in the fridge with the dressing on it...no sogginess the next day!

Wednesday, September 11, 2013

Broccoli Cheddar Bacon Stuffed Chicken Breasts

I don't like chicken. There. I said it. I find it boring, flavourless and annoying to cook. However...it is easy on the pocketbook, high in protein and low in fat. So i eat it. But not before adding fat back into it and yummy flavours to make it much better tasting!
 
Ingredients:
 
1 Cup Chopped Broccoli
5 Chicken Breasts
1/4 Cup Grated Cheddar Cheese
5 Strips of Bacon, cooked and chopped
2 Eggs
3/4 Cup Panko Bread Crumbs
1/2 Tsp Parsley Flakes
Salt & Pepper
 
 
Chop up your broccoli into small florets

Add the grated cheddar

And add the bacon. Mix this all together and set aside.

Using a very sharp knife fillet your chicken breasts (Or you can use a meat mallet and pound the chicken into thin fillets)

Grab a small handful of the broccoli filling and roll it into the chicken. Use toothpicks to hold the roll closed (or you can use less filling...but I like a lot of filling)

Beat 2 eggs into one bowl and mix together the panko, parsley and salt & pepper (to your taste) in another.

Carefully roll the chicken in the egg first and the Panko second.

Place in a greased baking dish and bake at 350F for about 15-20 Minutes then throw the broiler on and finish cooking the chicken on broil for about 5-10 minutes or until the bread crumbs are nice and brown and toasty.

Slice and serve!

Thursday, September 5, 2013

Peach Curd Doughnuts!

So I have always wanted to try making doughnuts. Its fried dough so it can't be that hard right? However, I was always scared of trying...deep frying kinda intimidates me and I didn't want to be stuck with raw dough in the middle, or oil burns, or garbage doughnuts :(
Then I took the plunge after much research this weekend. And they turned out AMAZING and pretty easy to make!!! I stopped at a farmers market to find some fresh fruit for my filling...and the peaches just smelled soo good! Glad I went with these!!
 
 
Ingredients
 
Peach Curd:
 
4 Ripe Peaches, peeled and chopped
2 Tbsp Warm Water
4 Egg Yolks
1/2 Cup Granulated Sugar
2 Tbsp Corn Starch
 
Doughnut Dough:
 
1 Cup of Whole Milk
1/4 Cup Butter, Chopped
1 Package (1 Tbsp) Instant Dry Yeast
1/4 Cup Warm Water
1/2 Cup Granulated Sugar
1 Egg
3 1/2 Cups All purpose Flour
1 Tsp Vanilla Extract
 
Sugar & Cinnamon to roll doughnuts in
 
In a saucepan add your chopped peaches and 2 Tbsp of warm water over medium heat


Allow peaches to simmer for about 10 Minutes. Use a potato masher to break them down until there are no chunks left.

In another bowl combine your egg yolks, 1/2 Cup of sugar and cornstarch.

Whisk well until combined. Add a small scoop of the cooked peaches to the egg mixture whisking quickly as to not let the egg scramble.

Pour the egg mixture all into the hot peach mixture and continue whisking (lower heat to low). Once the mixture starts to simmer it will thicken up.

Remove thickened Peach curd from the stove and place in a bowl. Cover with plastic wrap (with wrap touching the curd) and keep cool in the fridge

For the dough, warm your milk and butter over low heat just to the point where the butter starts to melt as pictured above...you do not want the milk hot. Remove from the heat.

Whisk your Yeast with the warm water.

In your mixer (on low) combine the yeast and milk/butter mixture.

Add your Sugar, 1 Egg, Vanilla and 2 of the 3 1/2 cups of flour. Mix until combined. Add remaining flour. Swap out the paddle with the dough hook on your mixer and allow the mixer to knead the dough for a good 5 minutes.

Place the dough in a lightly oiled bowl and cover to rise for 1 hour.

after an hour of rising turn out the dough onto a lightly floured surface. It does not need to be kneaded again at this point. You want the dough to remain light and fluffy.

 
Roll out the dough so that it is about 1/2" in thickness and using a round cookie cutter cut out your doughnuts and place them on parchment paper.
 

allow the doughnuts to rise again (covered) on the parchment paper for another 45 Minutes.

While the dough is rising I prepared my sugar topping. Just granulated sugar with a touch of cinnamon (In this case 3/4 Cup sugar, 1/2 tsp Cinnamon)

Now its time for the scary part!! Frying the doughnuts! Heat your oil (about 4" deep of it) until it reaches 350F (Use a candy thermometer if you aren't sure of the temperature). Place your doughnut in the hot oil to fry.

Using chop sticks...flip the doughnut once you see it lightly browning on the edges (It should take less than 10 Seconds!)

Immediately place the hot doughnut in the sugar mixture to coat.

Allow to cool on a cooking rack!

Using a piping bag and narrow piping bag tip, pipe the peach curd into the doughnut. I found it helped to use a sharp knife first to start the hole.

And there you have it!! 2 Dozen perfect delicious doughnuts!! We opted to make half with the filling and half without. Equally amazing! Can't wait to experiment with pumpkin flavours this fall!